Tiernan's Comms Closet

Geek, Programmer, Photographer, network egineer…

Currently Viewing Posts Tagged cloudflare

How to use Cloudflare Warp with a UDM Pro

If you’re considering using Cloudflare Wrap for specific machines on your network, you can easily install the Warp client directly on them. It supports various operating systems, including Windows, Linux, Mac, iOS, and Android. However, if you need to use it on devices that aren’t compatible with the client installation, for example, NAS Devices or Smart TVs, this tutorial may be helpful.

First, please note that this is not an officially supported option. Cloudflare might modify their configurations at some point, potentially causing this feature to break. You have been informed about this possibility.

What do you need:

  • UDM Pro (it can work on any Ubiquiti Unifi gateways, but this is the one I have).
  • Wireguard Configuration File Generator (WGCF). This tool will generate a Wireguard configuration file based on the Cloudflare settings.
  • I’ve created a script that executes the following commands. It worked on my MacBook Pro, and it should also work on Windows or Linux.

First, install WGCF. I installed it by running

brew install wgcf

on my Mac Book Pro.

Next, run:

wgcf register

This will register a client on your machine. A wgcf-account.toml file will be left in your running folder. Next, run the script again.

wgcf generate

You’ll be left with a wgcf-profile.config file in your running folder. Open this file in a text editor to access the necessary details for your next steps.

Go to your Unifi Network Dashboard, click on “Settings,” and then select “VPN” and “VPN Client.” Click on “Create New” and choose “Wireguard” as the protocol. Then, change the “Setup” to “Manual.”

The configuration file you created earlier should resemble this:

[Interface]
PrivateKey = <PRIVATEKEY>
Address = <IPv4Address>, <IPV6Address>
DNS = 1.1.1.1, 1.0.0.1, 2606:4700:4700::1111, 2606:4700:4700::1001
MTU = 1280
[Peer]
PublicKey = <ServerPublicKey>
AllowedIPs = 0.0.0.0/0, ::/0
Endpoint = <ServerEndpoint>

Use the contents of PrivateKey to overwrite the existing Private Key. This will automatically fill in your Public Key. Next, set your Tunnel IP to the value listed for IPv4Address. Remove the trailing slash and use that in the Netmask (my Netmask was a /32). Server Address is the value listed as ServerEndpoint. Check the port and include it as well. The Public Server Key is ServerPublicKey. Finally, add your DNS settings for IPv4 in the configuration and click Apply Changes.

After a few seconds, the status should change to “Connected”.

Next, you need to configure the Policy-Based Routes. This is located under the routing section, specifically under the heading “Policy-Based Routes.”

Here, you can name the rule and decide whether you want to send all traffic or specific traffic.

For all traffic, you can select a specific device or the entire network. For instance, in this example, all traffic from my Guest network will be routed through Warp:

You can also set it to send traffic to specific destinations:

Fallback allows it to fail back to one of the other connections if the Warp connection fails.

Finally, click Add Entry at the bottom. Now, run some tests on that machine and see the traffic counts increase.

That is now it. You can select what devices or networks, or even what destinations you want to send over Cloudflare. Happy hunting.

Day 9 of #100daysofhomelab

Well, day 9 of #100daysofhomelab is about Disaster Recovery… Well, at least the disaster part… Recovery not so much… My Kubernetes cluster, how do I put this… shat the bed… It’s been up and down all day and then the Longhorn storage failed and took my WordPress install with it… I lost yesterday’s post (which isn’t the end of the world) but it’s a pain in the ass… I ended up using the old docker copy of WordPress, so at least that’s online.

So, going to shut down the full cluster and start again… Might be looking at something other than Longhorn for storage… but giving up for the day… I will be back tomorrow.

day 3 of #100daysofhomelab

Day 3 of #100daysofhomelab and more Kubernetes messing today. Haven’t got it working, but messing with it is a start. Some links and notes are below:

I am planning on moving my WordPress install over from my Docker host to Kubernetes in the next few days, so running through the docks from Bharathiraja above, but I keep getting errors related to MySQL… More digging is required. I use Cloudflare Tunnels to secure my WordPress install, so the docs on how to use Cloudflare Tunnels with Kubernetes are important…

DNSControl and Github Actions #100daysofhomelab

I am participating in the #100daysofhomelab challenge and have been posting a lot on Twitter as @tiernano, but some posts and tasks I am doing will require longer-form write-ups. So, some updates will include either Videos (which will be published on my Youtube Channel) or blog posts, which will go here. This is the first of the blob posts.

DNSControl is a tool written by the Stackoverflow lads (when they called themselves StackExchange). It is designed to update DNS records and can work with DNS providers and registrars. I use it to update records in Cloudflare and Route53, but many providers are available. I wrote an article a while back about how to create reverse DNS records for IP space with Route53 and DNSControl, but most of it is still relevant, and the main documentation site for DNSControl has a lot of useful tips.

Up till this morning, if I wanted to update a record, I checked out the DNS records from my private Github repo, made the change, and ran the DNSControl commands on my machine (check for syntax checking the file, preview to show what will change at the provider level, and push to make the changes). But I wanted to have some automation for this. So, enter Github Actions.

I did a bit of digging and found a Github Action from koenrh called dnscontrol-action. The docs on this are quite simple to go through, so I created 2 action files for my Repo: preview and push. a Gist for Preview is below:

and the one for push is as follows:

The important parts are as follows:

In both preview and push, the check command does a syntax check of your DNS config file. Then preview will check the providers to see if any records need an update. When push runs, it will make the changes.

All my required secrets are set in the Github repo as secrets, so when the action is run, it will pull the required keys out. These are put into the environment variables. I use name.com and a registrar for some domains (though most have now moved to Cloudflare, and some, like my .ie domains, are with Blacknight, who are not supported on DNSControl). Cloudflare is used by the majority of my domains, and Route53 is used for 2 domains currently. There are around 53 domains current managed by this, and the plan is to add more. I also plan on getting some more automation around checking configs and sending alerts if anything changes.

So, enough “How it works” and show us it working!

Right. Let’s update my zt.tiernanotoole.net domain, which is used for Zerotier IPs internal to my network. It’s been a while since I did this, so most will be removed and a few adds… first, I create a new branch, called zt-update, and check it out in VSCode. I made my changes, git committed and git pushed to the branch.

at this stage, the actions have NOT run, since this is neither checked in to master, nor a PR for master.

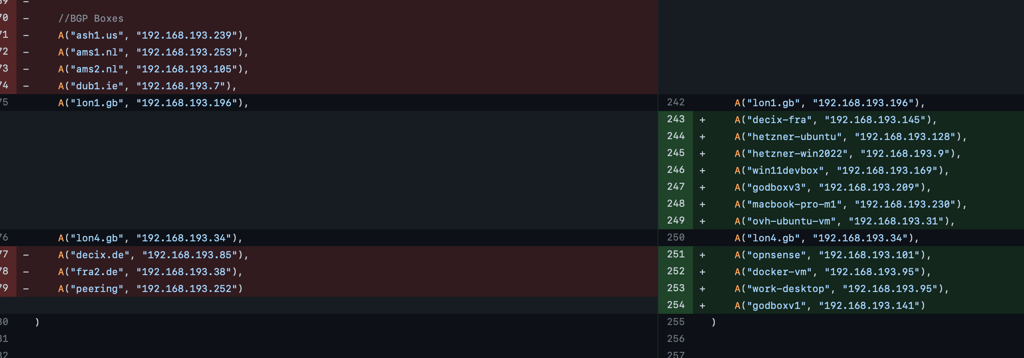
I go into the create PR section, and I can see the changes I have made. in my case, I removed a load of unused records and added extras:

I now create my PR and wait for the checks to complete:

within a short time, I get an alert that all checks have passed, and I can find the results of the changes in the build (It was meant to add a note to the PR with the details, but I might be missing something in my config…)

Also, not sure why it is redacting part of my name here…

I check the rest of the list, and other than the deletes and creates in route53 for this domain, there are no other changes. So, being happy with that, I click the Merge Pull Request and the code is checked into master, and the DNSControl push command runs:

If i now go into Route53, i can see the records on the site:

Happy days! Next challenges to fix:

  • fix the PR to include the output of check and preview
  • only run a check and push on the master branch, and no need to run preview again…
  • run preview once a week and send alerts if anything has changed

Till next time, good luck!