Tiernan's Comms Closet

Geek, Programmer, Photographer, network egineer…

Currently Viewing Posts in Hardware

Some Random links for Prime Day 2023

Well, it’s Prime Day 2023, so I have been busy ordering some stuff, and, well, given everyone and their mother is doing posts on Prime Day stuff, I thought I would add my list of interesting things, including some of the things I bought. PS: all links are affiliate links and were found in the UK Store, but links are using GeniusLink to redirect you to the best store for you… Some items in the UK store might not be found in the US or other stores…

So, first, the things I bought:

Now, for things I don’t need (or can’t afford…) but caught my eye while browsing.

Of the stuff I have ordered so far, the Ryzen 5 machine should arrive tomorrow, so I hope to do some sort of unboxing on my YouTube channel. Maybe head over and subscribe while your waiting!

Day 61 of #100daysofhomelab – swapping disks in a Hetzner Dedicated Machine

It’s been a while… So, for Day 61 of , I thought I should write up how to swap a disk in a Hetzner Dedicated Machine.

I have a dedicated server I rent from Hetzner in Germany. It has an Xeon E5-1650 V2 processor (6 cores, 12 threads, 3.5Gz base, 3.9Gz turbo), 128Gb RAM, and a pretty impressive 15 6Tb HDD. All drives are hooked to a Mega RAID controller, but because I am running ProxMox, I left it in JBOD mode and set up the 15 drives in RAIDZ-2. All 15 drives are in a single pool (probably not ideal, but it works for me). Now and again, I get a message from ProxMox telling me about bad blocks… and every time it happens, I have to remember what to do to find the bad drive, report it to Hetzner, wait for them to replace the drive and then add it back to the pool… Today, it happened, so I thought I better document it, to help future me, and hopefully someone else out there…

First, we need to find the drive in question. Usually, I’m my alerts, I get the Serial number of the drive causing problems. So, I ran the following command:

megacli -PDList -aAll | egrep "Enclosure Device ID:|Slot Number:|Inquiry Data:|Error Count:|state"

This gives me a full list of drives along with the Slot Number (needed when sending to Hetzner) and the Serial Number. the data output starts with the “Enclosure Device ID:” so when you find the Serial number, look above it for the Slot Number… so, my issue is with the disk in Slot 10. I opened a support ticket with Hetzner requesting a replacement disk. It can take an hour or more for this, but sometimes faster. Depends on their load…

Once you get a confirmation that the disk is done, you now need to swap it into the zpool.

first, we must check if the new drive is set up correctly. Run the following:

megacli -PDList -a0 | grep Firmware

We are looking for “Firmware status: Online, Spun Up”. If we have anything marked as configured, we need to run the following:

megacli -CfgForeign -Scan -a0

This shows us any foreign configurations. If that’s more than 0, we run:

megacli -CfgForeign -Clear -a0

This clears out that configuration. Next, we need the Enclosure ID and Slot number for the new drive from:

megacli -PDList -aAll | egrep "Enclosure Device ID:|Slot Number:|Inquiry Data:|Error Count:|state"

cause we need to run:

megacli -PDMakeGood -PhysDrv [<enclosure>:<slot>] -a0

Finally, run:

megacli -CfgEachDskRaid0 WB RA Direct CachedBadBBU -a0

Note: If that fails with a message about cache data, you may need to run:

megacli -DiscardPreservedCache -L"10" -a0

This will clear the cache and then you can run the CfgEachDskRaid0. This will mark all new disks as JBOD disks… used for ZFS. If you have something different, check the docs from Hetzner below.

Next, we need to swap disks in ZFS. Run

zpool status

to get the info about the missing disks. the missing disk will show as unavailable. Next, find the ID of the disk that was added.

cd /dev/disk/by-id/

ls

find the new disk (usually wont have any partitions on it). Now, its a matter of running the following:

zpool replace rpool /dev/disk/by-id/scsi-3600605b008f498802aa37da51674ea7e-part3 /dev/disk/by-id/wwn-0x600605b008f498802b2a3a683752e088

swap the scsi-36xxx and wwn-0x6xxx parts for the ones you found and rpool with your ZFS pool name.

finally, run

zpool status

to see the status, run:

zpool status -v -1

shows you the status with more info and refreshes every second. ZFS is now running in the background resilvering the drives and swapping out the old ones. since the old one is missing, it will wait till the new drive is sorted then remove the old one. This can take some time, depending on your disks and data size.

Hopefully, this helps someone!

Some links for info:

LSI RAID Controller – Hetzner Docs

Day 57 of #100daysofhomelab

Day 57 of and its a link dump for today:

Day 56 of #100daysofhomelab

Day 56 of and I managed to fix some stuff with my TrueNAS box. There was lots of messing when it came to permissions, but it works now. Some speeds are below. Not quite getting the speeds I was expecting, but there I have not tweaked anything, yet… This is going from my MacBook Pro with a 10Gb adapter. The reads are quite good, but the writes… well, the HDDs are FASTER than the NVMe… No idea why… I did get a new card to add another 4 NVMe drives in… We’ll see what happens when that gets built.

NVMe drive speed
Spinning Disk Speeds

And now, the links:

Day 53 of #100daysofhomelab

Day 53 of and It’s been a busy week… ish… I’ve been battling with Vertigo on and off this week, so haven’t don’t a lot. I did, however, fix some issues with the network, set up a proper failover WAN connection using SmoothWAN and my Quad 2.5Gb Box, and have started making major changes to GodBoxV3.

Originally, GodBoxV3 had all spinning disks (8 8Tb drives shucked from WD My Book 8TBs or 8TB Seagate IronWolf) in a single RAID 5 pool in Windows Storage Spaces. Then the NVMe drives were a second pool (5 of them, 4 Force MP510 480Gb NVMe SSDs on a Hyper M.2 x16 card and a 5th unbranded one of a 1X PCI-E add-in card) and a third pool of 2 960Gb IronWolf SSDs.

I deleted the RAID5 and NVMe arrays, and now, for testing, I have spun up a TrueNAS Core VM on the 2 SSDs and passed the NVMe and HDDs into that VM. Windows can still “see” them, but they are marked as offline, but Hard Disk Sentinel and CrystalDiskInfo can both see the SMART status of them (TrueNAS cant, weirdly…). Then, I have 7 of the 8 drives added to a single pool (one is failing so I left it out, this is for testing currently, anyway) and then the 5 NVMes are added to a second pool (the plan is to use the 4 Force MP510s or replacement drives as a single pool, then the other NVMe (or maybe even 2) as a Cache or Log for the Spinning disk pool).

So far, doesn’t matter if I am using the NVMe or HDD pool, but speeds from my Mac (with a 10Gb Thunderbolt adapter) are around the same… Might be a config issue, might be the odd NVNe drive slowing the rest down… but I am happy with the speeds so far… I have seen 3-400Mb/s Writes and 900+ Reads on both NVMe and HDD… Most of that is probably cached… the VM has 64Gb RAM given to it, and the test file was only 5Gb (BlackMagic Disk Speed Test). More testing is required though.

Day 14 of #100daysofhomelab

Day 14 of #100daysofhomelab and I have been thinking about future upgrades if I had the money… So, I have my CloudShed in the back garden. Currently, I only have an HP Micro Server and a (not currently in production) Dell R720, along with a Ubiquiti Edge Switch 48 Lite. Between the Shed and the house is a fibre link purchased through FS.com, with 6 pairs. Currently, only 1 pair is in use, giving me a 10Gb/s between the house and shed, and with the easy option to upgrade to 20Gb. But I have been thinking bigger.

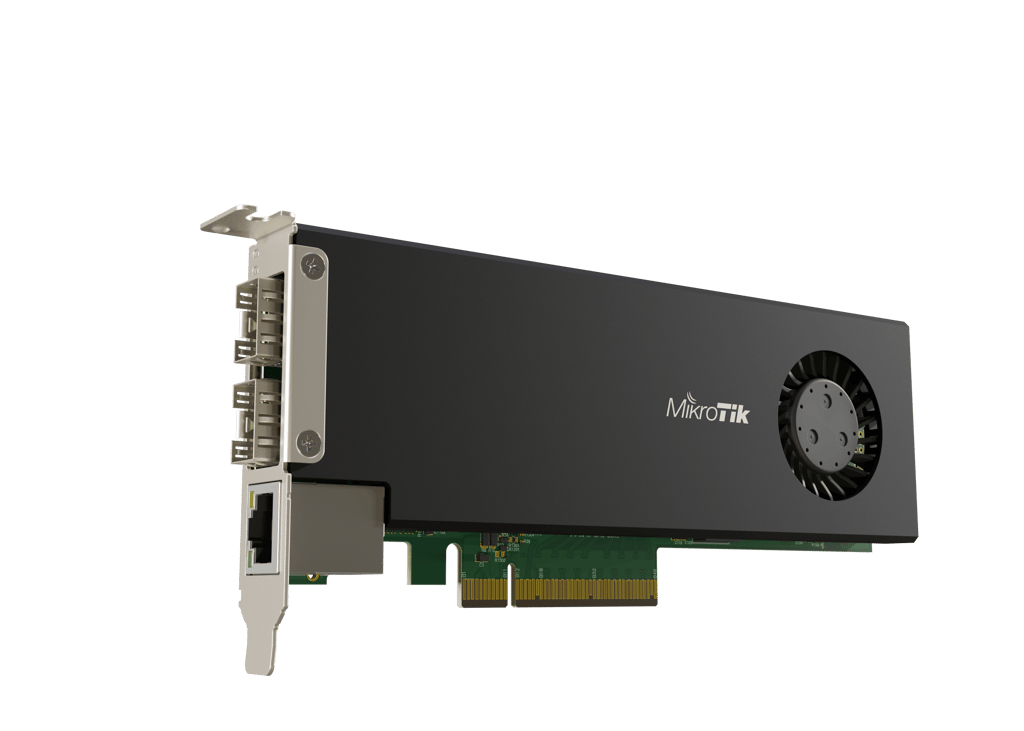
I have been looking at the Mikrotik CCR2004-1G-2XS-PCIe (a bit of a mouthful…) SmartNIC. It’s a full MikroTik router on a PCIe Card. It has a Quad-core ARM Processor, 4GB RAM, some storage and 2X25Gbit/s Interfaces… Well, technically, 4… there are 2 front connectors and 4 that the host server sees… If I am reading the diagram below correctly, it looks like all ports are seen by the Host, but 2 go through the bridge and 2 go direct… I haven’t played with one yet (Mikrotik, if you are listening, hint, hint!) so not sure how it would work… A review from Alyx Wijers says that on the Linux box they tried, the 10Gb SFP+ module they had shows in passthrough and the other 2 are connected to the bridge… Ideally, for the ideas i have for this, I passthrough would be handy for stuff like storage, but i would want the rest of my traffic going over that bridge interface… Or at least i think thats how it would work…

The card has 2X25Gb ports (SFP28 ports) that connect to the rest of your network, for example to a CRS504-4XQ-IN switch (4x100Gb ports, which can be broken out into 4x25Gb ports each…). If you go through the bridge, you get all the features of RouterOS, like firewall rules, VXLAN, etc, all in the NIC. The switch then doesn’t need to do as much, letting it do the switching and leaving everything else at a NIC level. If you use passthrough, you, essentially, bypass the router/firewall rules… I think…

So, what would my plan for the upgrade be? Well, this is where things get expensive… I would need 2 of the switches (one in the house, one in the shed linked with a single 100Gb fibre). Then, I would need 8 of the SmartNICs (GodboxV3, GodBoxV2, 1 for each of the R720s (second one coming soon), 1 for each of the R620s (coming soon), one for the HP DL380 G8 (also pending) and 1 for the big storage box… again, pending). The plan would be that GodBoxV2 and V3 would be in the house, and both connect to the house switch at 25Gb a sec. there would be uplinks to internal 10Gb switches along with the UDM Pro.

In the shed, the 6 servers would each connect to the switch at 25Gb, using 10 of the renaming 12 ports. The R720s, Storage Box and HP will probably get 2x25Gb connections. In theory, the R620s could also connect at 50Gb but I would have no extra room later… Might not be a major issue, mind you. There would be spare ports in the house… I could, in theory, get a second 100Gb switch for the shed! 😛

But, what would this cost? Well, current prices are showing that the cards are around 200EUR a pop and the switch is just shy of 800 quid… so, for a little under €3200, I could get 2 switches and 8 NICs. I would need break-out cables, 100Gb Optics, and some other bits, so, say 500 quid for that… So, just under 4k? One of these days, hey! I can dream!

MikroTik CRS504-4XQ-IN Review Momentus 4x 100GbE and 25GbE Desktop Switch (servethehome.com)

Review: A Dive into Mikrotik’s Weird SmartNIC (CCR2004-1G-2XS-PCIe) // Alyx Wijers

day 4 of #100daysofhomelab

Day 4 of #100daysofhomelab and I am still reading the docs I posted yesterday on Kubernetes. I hope to get something sorted this weekend… On a different note, I posted a new YouTube video on the iODD ST400, linked below. This is a follow-up to my iODD Mini review I did a couple of years back. Hopefully, I will have a second video with some speed tests and a better walk in the next few days… hopefully.

Update: I think I am going to have to get my i7 with 6 2.5Gb Ethernet ports and one of the R720s up and running soon… I am running out of memory on my Proxmox cluster.

Unifi Network Update 7.1.61

A few weeks back, Ubiquiti released a pre-release update for the Unifi Network Controller, version 7.1.61. It got installed on my UDM and I noticed a few interesting bits that you might find handy… First, you will need to be signed up for Unifi Early Access before you can download or even read the release notes, but this is just a quick update based on my findings so far.

The first thing to note: You can see the list of devices connected to switches on the Overview Tab. I can’t remember exactly when that was added, but I think it’s new…

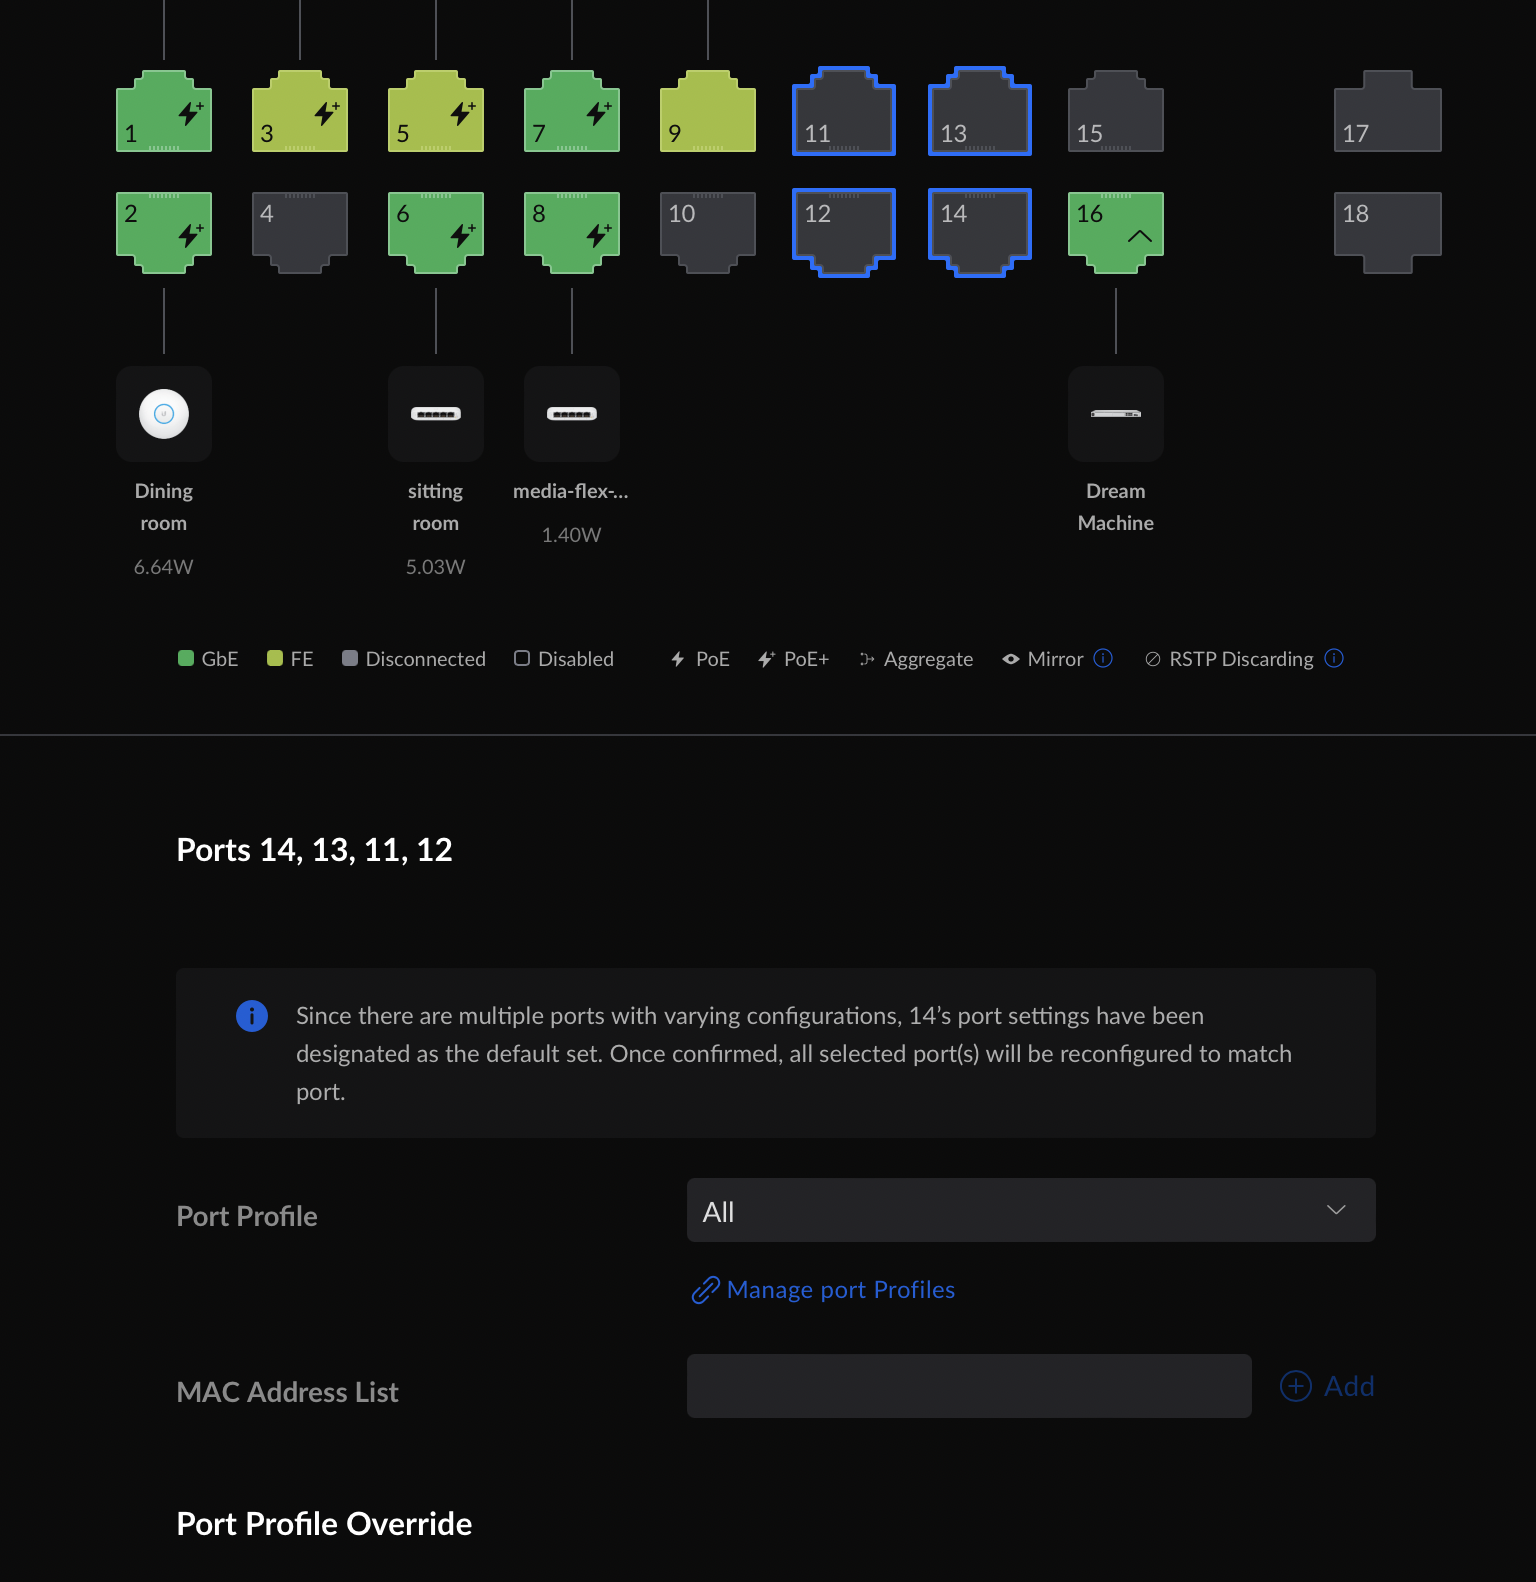
Under the ports tab, you now have a ports insight option:

Clicking this give you:

You can also select multiple ports and make changes at a bulk level:

You can also see a bit more info about each port:

Teleport VPN is also now added. This makes giving someone access to your network a LOT easier than usual. They will need the WifiMan software on Android, iOS or Mac to join. Not sure what happens on a Windows machine… Maybe it’s coming soon? To use it, just generate a new link and send it to your user. Not sure how to remove them afterwards (if you want to give them temp access for example…)

Final Interesting part, and something I have been waiting for for a while, under Traffic Management, you can now create custom traffic rules:

You can set it based on destination Domain Name, IP or even the full internet:

And you can set the Source to be All Devices, group of devices (network) or individual (or multiple targeted) devices.

Finally, you can set the output internet connection.

If you had multiple internet connections, and one had better speeds for stuff like Netflix, or you wanted to send bulk data over a different link, you can do this using this feature. Very cool stuff.

So, still testing, but looking good so far.

Raspberry Pi in a car, part 2

For the last few weeks, I have been running a Raspberry Pi in my car, along with a small UPS and a Wifi Access point, allowing me to download videos from my dash cam and back them up to my NAS in the house. But I have had some teething issues, and I am currently thinking my way through some fixes…

  • First, the Pi is connected to both the network in the car (via ethernet) and network in the house (via Wifi). It seems that when the car is parked outside, sometimes the Pi can’t talk to the internet, and sometimes it can’t talk to the dashcam… It’s a routing issue, and it’s starting to annoy me…
  • I thought the onboard Wifi on the Pi was a little weak… it wasn’t getting much more than about 2-3Mbytes/s (16-24MBit/s) when downloading from the Pi to the House. Given the Pi was serving content from an SSD (not the internal MicroSD) I would have hoped for faster. I tried swapping in an external Wifi dongle with an aerial, but the same kind of speed… must be having issues getting through the metal and glass in the car, plus the metal, glass and brick in the house…
  • I started running out of disk space on the SSD on the Pi after about 3 or 4 weeks of video… so, I needed to tweak the command for the download script to only keep 14 days on the pi. Resilio Sync, the app I use to sync back to the house, has a “keep deleted files in an archive” folder option, so when the pi does delete the files, they are still stored on the Pi… I would like to find a way of automating that…

While trying to figure out how to fix part 1, I came up with an idea: I have an older Mikrotik RB951G that can be powered via a 12v adapter for the car. I am going to use that, along with a Huawei 4G dongle to act as an internet connection. The onboard Wifi will be in client mode, so when it’s near the house, it will connect to the main network and send traffic through that to the internet (or internal NAS) and when away, use the LTE modem. Then, using the Wifi dongle on the Raspberry Pi, use that as a Wifi AP.

Anything in the car that needs Wifi will connect to the Pi, which will act as a bridge to the Mikrotik. When the script needs to download files from the dashcam, it should have a direct connection to it, plus (hopefully) will be faster… then the Pi is connected to the internet through the Mikrotik. The Pi has both Tailscale and Zerotier on it for remote management, and the Mikrotik can be configured to use Wireguard to connect back to the house directly if required.

I have some of this working on a bench in the house, but it will be a while before I manage to get this running fully… Hopefully, I will have some more stuff sorted this weekend…

Running a Raspberry Pi in a car and backing up dashcam footage

A few months back (well, November 2020) I wrote about connecting to my car with Zerotier. In this post, I mentioned using a TP-Link router running OpenWRT and a Huawei LTE dongle to connect to the internet, which allowed me to then connect to my Blackvue Dashcam and watch remotely… But it had some issues I wanted to fix:

  • The Huawei Wingle was a little slower on 4G than I would have hoped…
  • When the power in the car went out, everything stopped working immediately (12V sockets in the car run for about 20 min after the engine shut off)
  • It did not connect to the WiFi in the house when parked
  • No option for backing up Video…

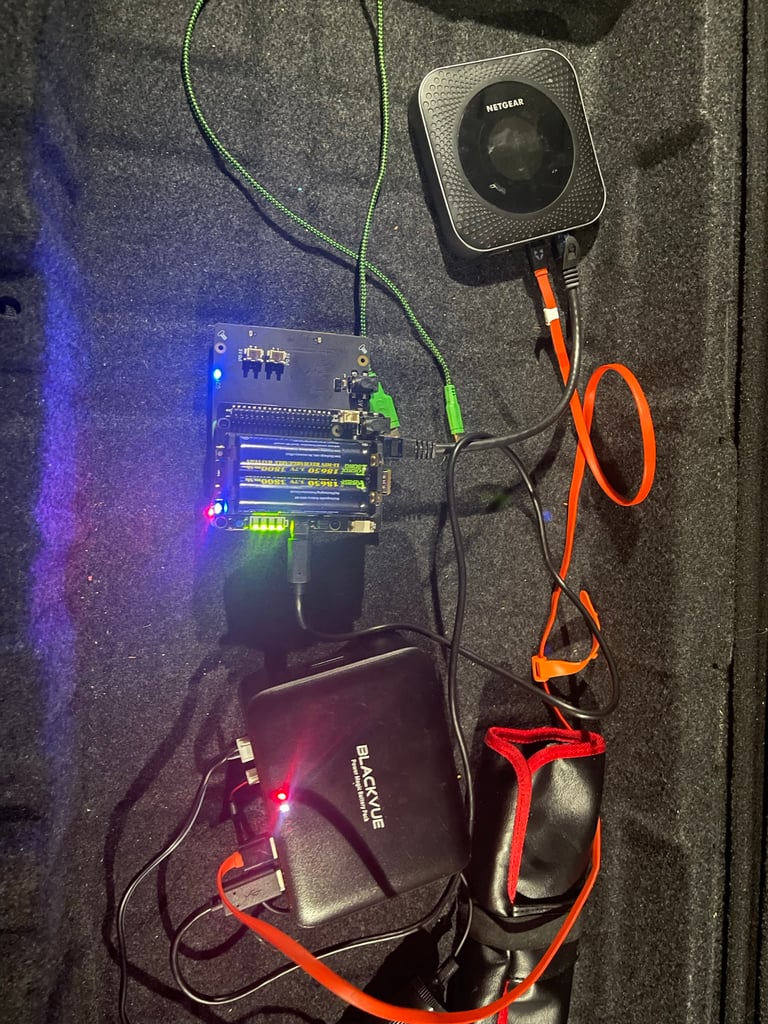
So, I went digging to find some alternatives… and I realized I had a load of them floating around the house: the Raspberry Pi. Specifically, the 4GB Pi 4. I got my hands on a Pi UPS Hat, a couple of 18650 Cells and an SSD Expansion board with a 512GB (overkill I know) SSD. I also got a BlackVue Power Magic Battery, B112, which will power the Dash Cam (a BlackVue DR750S-2CH). It has 2 USB ports, which allows me to run both the Pi and the new WIFI router, a Netgear Nighthawk M1.

When the car starts, it powers, via the 12V socket in the boot of the car (trunk for my American friends), which powers the Blackvue Battery. Cables run from there to the front of the car where the front camera is. (there is also a rear-facing camera in the boot too… more cables!) This then also starts the Pi and starts charging the 2 18650 batteries. Finally, well, at the same time really, the Nighthawk starts running too. Because the batter on this was running hot, the battery is removed from this.

The Pi is hooked to the Nighthawk via ethernet and the WIFI is set to connect to the house when it sees it. The BlackVue uses the WIFI from the Nighthawk for its internet requirements. When the pi boots, it connects to Zerotier for management via SSH or VNC (I use VNC to remote into the box and watch the live video when the car is parked or when someone else is driving).

There is also a python script that is scheduled to run every 15 min that downloads the videos from the Dashcam. It also downloads any GPS and other info. The folder these files are downloaded to is on the SSD and is shared with my machine at home via Resilio Sync. To make sure I don’t use all my LTE usage, the machine at home is set to only download what I want to download. So, if the car is somewhere else, I can download specific files when I want, or when at home, I can download full days, if required.

It’s been running for a few weeks now, and so far, so good. I haven’t had to do any clean up of the SSD, yet, but I would guess that eventually, I will need to look into that… With the 4G connection and Zerotier, I can then connect to my car and watch the live video whenever it is online, and whenever it is driving, within 15 min it will start downloading videos. I could, in theory, do a LOT more with the Pi in the car… Some ideas that come to mind:

  • Turn WIFI off on the Nighthawk and use the Pi as a Router, probably adding a second WIFI adapter to get better range… This could then have PiHole running on it for monitoring DNS traffic…
  • Since I have access to the GPS files in (somewhat) real-time, use it to map the car in somewhat real-time. Though, I do this already using Ruhavik and a Teltonika FMC-001.
  • Connecting to the car’s OBDII port (On-Board Diagnostics) and getting data from the car… Technically, again, the FMC001 does most of this, but in theory, it could be replaced with something else…

Keep an eye on the blog for future possible projects with this… Not sure where this project will get me, but we will figure it out at some stage… Leave a comment if you have questions!